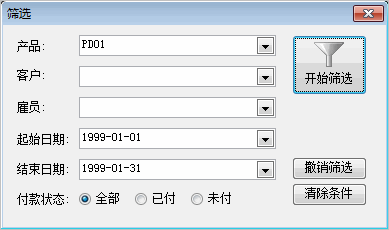
设计查询窗口
本课的示例文件为CaseStudy目录下的“窗口筛选.table”。
Foxtable本身的筛选功能已经非常强大,不过如果自己设计一个筛选窗口,用起来也许更顺手。
本课的目的就是设计一个下图所示的筛选窗口:

设计步骤
1、插入一个组合框,改名为“cmbProduct”,列表项目设为“PD01|PD02|PD03|PD04|PD05”,用于输入要筛选的产品。
2、插入一个组合框,改名为“cmbCustomer”,列表项目设为“CS01|CS02|CS03|CS04|CS05”,用于输入要筛选的客户。
3、插入一个组合框,改名为“cmbEmployee”,列表项目设为“EP01|EP02|EP03|EP04|EP05”,用于输入要筛选的雇员。
4、插入一个日期输入框,改为名“StartDate”,用于输入开始日期。
5、插入一个日期输入框,改为名“EndDate”,用于输入结束日期。
6、插入三个按钮,标题和Click事件代码按下表所示设置。
| 标题 |
Click事件代码 |
| 清除条件 |
e.Form.Controls("cmbProduct").Value = Nothing
e.Form.Controls("cmbCustomer").Value = Nothing
e.Form.Controls("cmbEmployee").Value = Nothing
e.Form.Controls("StartDate").Value = Nothing
e.Form.Controls("EndDate").Value = Nothing |
| 撤销筛选 |
Tables("订单").ApplyFilter = False |
| 开始筛选 |
Dim Filter As
String
With e.Form.Controls("cmbProduct")
If .Value IsNot Nothing
Then
Filter = "产品 = '" & .Value & "'"
End
If
End
With
With e.Form.Controls("cmbCustomer")
If .Value IsNot Nothing
Then
If Filter > "" Then
Filter = Filter & " And "
End
If
Filter = Filter & "客户 = '" & .Value & "'"
End
If
End
With
With e.Form.Controls("cmbEmployee")
If .Value IsNot Nothing
Then
If Filter >"" Then
Filter = Filter & " And "
End
If
Filter = Filter & "雇员 = '" & .Value & "'"
End
If
End
With
With e.Form.Controls("StartDate")
If .Value IsNot Nothing
Then
If Filter >"" Then
Filter = Filter & " And "
End
If
Filter = Filter & "日期 >= #" & .Value & "#"
End
If
End
With
With e.Form.Controls("EndDate")
If .Value IsNot Nothing
Then
If Filter >"" Then
Filter = Filter & " And "
End
If
Filter = Filter & "日期 <= #" & .Value & "#"
End
If
End
With
If Filter > "" Then
Tables("订单").Filter = Filter
End
If |
7、窗口类型设为独立,自动打开属性设为True。
设计中的窗口:

就是这个例,假如加个打印按钮,打印按钮的代码怎么写呀


 加好友
加好友  发短信
发短信

 Post By:2011/10/9 17:32:00 [只看该作者]


 加好友
加好友  发短信
发短信

 Post By:2011/10/9 17:34:00 [只看该作者]


 加好友
加好友  发短信
发短信

 Post By:2011/10/9 17:36:00 [只看该作者]


 加好友
加好友  发短信
发短信

 Post By:2011/10/10 9:42:00 [只看该作者]
